Saturday, April 18, 2009

JPA/Hibernate - One to One Mapping Quirks

Introduction

I have been working on a product where I am currently using Hibernate implementation of JPA (Java Persistence Architecture) as data persistence mechanism. While working, I came across an interesting finding about one-to-one mapping using annotations. In this short article, I would like to explain my findings that may be of help to some novice JPA/Hibernate developers.

Technical Details

Let us take Users.java and Contacts.java as domain examples to explain the scenario. In this case, User object has certain attributes and Contact object also has its own specific attributes. Assume a user can have only one contact, then one of the common ways of expressing one-to-one relationships is to have the dependent object share the same primary key as the controlling object. In UML, it is called "compositional relationships".

User.java

@Entity
@Table (name="Users")
public class Users implements Serializable{

private static final long serialVersionUID = -3174184215665687091L;

/** The cached hash code value for this instance. Setting to 0 triggers re-calculation. */
@Transient
private int hashValue = 0;

/** The composite primary key value. */
@Id
@GeneratedValue(strategy=GenerationType.IDENTITY)
@Column (name="id")
private Long Id;

/** The value of the simple username property. */
@Column(name = "username", unique=true, nullable=false)
private String username;

/** The value of the contacts association. */
@OneToOne(cascade = {CascadeType.ALL}, fetch=FetchType.LAZY, optional=true)
@PrimaryKeyJoinColumn
@JoinColumn (name="id", nullable=false)
private Contacts contacts;

.....

public Users(){}

/**
* @return Id
*/
public Long getId(){
return this.Id;
}
/**
* @param id - The Id to set
*/
public void setId(Long id){
this.hashValue = 0;
this.Id = Id;
}
/**
* @return Contacts
*/
public Contacts getContacts(){
return this.contacts;
}
/**
* @param Contacts - The contacts to set
*/
public void setContacts(Contacts contacts){
this.contacts = contacts;
}

....
}

Contacts.java

@Entity
@Table (name="Contacts")
public class Contacts implements Serializable{

private static final long serialVersionUID = -1079313023058953957L;

@Id
@Column (name="id")
private Long Id;

/** The value of the users association. */
@OneToOne(optional=false)
@JoinColumn (name="id")
private Users users;

....

public Contacts (){}

/**
* @return Id
*/
public Long getId(){
return this.Id;
}
/**
* @param id - The Id to set
*/
public void setId(Long id){
this.hashValue = 0;
this.Id = id;
}
/**
* @return Users
*/
public Users getUsers(){
return this.users;
}
/**
* @param users - The users to set
*/
public void setUsers(Users users){
this.users = users;
}

....
}


The above set up will result in an error message that says like the following:

Exception raised - org.hibernate.id.IdentifierGenerationException:
ids for this class must be manually assigned before calling save(): com.vbose.Contacts

The problem is that Hibernate is confused in this case. It thinks that it should look at the Id column to determine the primary id of the table. In reality, we should have told Hibernate that the Users object is the thing that provides the id. In order to help Hibernate understand how to properly resolve the id, we need to annotate the id column of the Contacts with a special "Generator", like so:

The one below is an enhanced Contacts.java domain object:

@Entity
@Table (name="Contacts")
public class Contacts implements Serializable{

private static final long serialVersionUID = -1079313023058953957L;

@Id
@GeneratedValue(generator="foreign")
@GenericGenerator(name="foreign", strategy = "foreign", parameters={
@Parameter(name="property", value="users")
})
@Column (name="id")
private Long Id;

/** The value of the users association. */
@OneToOne(optional=false)
@JoinColumn (name="id")
private Users users;

....

public Contacts (){}

/**
* @return Id
*/
public Long getId(){
return this.Id;
}
/**
* @param id - The Id to set
*/
public void setId(Long id){
this.hashValue = 0;
this.Id = id;
}
/**
* @return Users
*/
public Users getUsers(){
return this.users;
}
/**
* @param users - The users to set
*/
public void setUsers(Users users){
this.users = users;
}

....
}


The additional annotation at the "Id" property says that the generated value of the Id column comes from a special generator that simply reads a foreign key value off of the users object. Please note that contacts object has to be set in Users and vice versa in order to establish bi-directional relationship before setting other properties of each objects. This bi-directional setup will prevent the users from getting the following exception
org.hibernate.id.IdentifierGenerationException: attempted to assign id from
null one-to-one property:
For e.g.

Users users = new Users();
Contacts contacts = new Contacts();
users.setContacts(contacts);
contacts.setUsers(users);

The above set up works for inserting a new record using cascade option set for the child object association at the parent level. So you can safely use entityManager.persist(object). However, please note the "optional" parameter set for Contacts one-to-one association at the Users object. This optional parameter plays a key role while saving the child association via its parent using cascade option. If you do not set the "optional" parameter at the parent as well as its child object, then you will likely get the above said exception while updating the parent and its child association via cascade option. This error is prominent if you add a new child through its parent while updating the parent that has reference to a new child entity.

For e.g. If you replace the existing contact instance with a new contact instance (with the foreign key assigned from its parent object as the child object's parent key as well as its foreign key to its parent) and update the changes using entityManager.merge(users) operation will result in the same above said error if the "optional" parameter is not set properly at the one-to-one association annotation.

The "optional" parameter should be set to true at the parent level and should be set to false at the child object level.

However please note the "optional" parameter at the one-to-one mapping is not really required if you just do plain update to the existing child entity or its parent entity.

Conclusion

The above said quirk is not documented in Hibernate reference document. I hope it will help any novice JPA/Hibernate developers who are facing problems with one-to-one mapping using annotations.
Wednesday, March 18, 2009

Apache Commons DBCP and Tomcat JDBC Connection Pool

Introduction

The SpringSource tomcat architects are coming up with a new connection pool called Tomcat JDBC Connection Pool. This poses many questions to so many people like why do we need another connection pool when there is already an established Apache Commons DBCP pool available. In this article, I would like to point out some drastic differences between Apache DBCP and the new Tomcat JDBC Connection Pool. I strongly feel Tomcat JDBC Connection Pool is much superior to DBCP and highly recommend all users to check it out.

Database connection

A database connection is a facility in computer science that allows the client software to talk to database server. The database server could be running on the same machine where the client software runs or not. A database connection is required to send commands and receive answers via result set.

Connection Pool

Database connections are finite and expensive and can take disproportionately long time to create relative to the operations performed on them. It is very inefficient for an application to create and close a database connection whenever it needs to send a read request or update request to the database.

Connection Pooling is a technique designed to alleviate the above mentioned problem. A pool of database connections can be created and then shared among the applications that need to access the database. When an application needs database access, it requests a connection from the pool. When it is finished, it returns the connection to the pool, where it becomes available for use by other applications.

Apache Commons DBCP Connection Pool

There are several Database Connection Pools already available, both within Jakarta products and elsewhere. This Commons package provides an opportunity to coordinate the efforts required to create and maintain an efficient, feature-rich package under the ASF license.
Applications can use the commons-dbcp component directly or through the existing interface of their container / supporting framework.

Jakarta Tomcat the leading application server is also packaged with DBCP Datasource as the JNDI Datasource. The beauty of DBCP is that it can be used with so many applications or frameworks and it works with almost all databases in the market.

However, DBCP presents some challenges or concerns as well in spite of its popularity. Some of the challenges or concerns with DBCP are given below.

  1. commons-dbcp is single threaded. In order to be thread safe commons-dbcp locks the entire pool, even during query validation.
  2. commons-dbcp is slow - As the number of logical CPUs grow, the performance suffers, the above point shows that there is no support for high concurrency even with the enormous optimizations of the synchronized statement in Java 6, commons-dbcp still suffers in speed and concurrency.
  3. commons-dbcp is complex, over 60 classes. tomcat-jdbc-pool, is 8 classes, hence modifications for future requirement will require much less changes.
  4. commons-dbcp uses static interfaces. This means you can't compile it with JDK 1.6, or if you run on JDK 1.6/1.7 you will get NoSuchMethodException for all the methods not implemented, even if the driver supports it.
  5. The commons-dbcp has become fairly stagnant. Sparse updates, releases, and new feature support.
  6. It's not worth rewriting over 60 classes, when something as a connection pool can be accomplished with a much simpler implementation.
Some of the benefits of Tomcat JDBC Connection Pool are given below.
  1. Tomcat jdbc pool implements a fairness option not available in commons-dbcp and still performs faster than commons-dbcp.
  2. Tomcat jdbc pool implements the ability to retrieve a connection asynchronously, without adding additional threads to the library itself.
  3. Tomcat jdbc pool is a Tomcat module, it depends on Tomcat JULI, a simplified logging framework used in Tomcat.
  4. Support for highly concurrent environments and multi core/cpu systems.
  5. Dynamic implementation of interface, will support java.sql and javax.sql interfaces for your runtime environment (as long as your JDBC driver does the same), even when compiled with a lower version of the JDK.
  6. Validation intervals - we don't have to validate every single time we use the connection, we can do this when we borrow or return the connection, just not more frequent than an interval we can configure.
  7. Run-Once query, a configurable query that will be run only once, when the connection to the database is established. Very useful to setup session settings, that you want to exist during the entire time the connection is established.
  8. Ability to configure custom interceptors. This allows you to write custom interceptors to enhance the functionality. You can use interceptors to gather query stats, cache session states, reconnect the connection upon failures, retry queries, cache query results, and so on. Your options are endless and the interceptors are dynamic, not tied to a JDK version of a java.sql/javax.sql interface.
  9. High performance
  10. Extremely simple, due to the very simplified implementation, the line count and source file count are very low, compare with c3p0 that has over 200 source files. Tomcat jdbc has a core of 8 files, the connection pool itself is about half that.
  11. Asynchronous connection retrieval - you can queue your request for a connection and receive a Future back.
The usage of Tomcat JDBC Connection Pool is very simple and for people who are already familiar with DBCP, the transistion is very simple.

The Tomcat connection pool offers a few additional features over what most other pools let you do:

  • initSQL - the ability to run a SQL statement exactly once, when the connection is created.
  • validationInterval - in addition to running validations on connections, avoid running them too frequently.
  • jdbcInterceptors - flexible and pluggable interceptors to create any customizations around the pool, the query execution and the result set handling.
  • fairQueue - Set the fair flag to true to achieve thread fairness or to use asynchronous connection retrieval.
JNDI Factory and Type

Most attributes are same and have the same meaning as DBCP.

  • factory - factory is required, and the value should be org.apache.tomcat.jdbc.pool.DataSourceFactory
  • type - type should always be javax.sql.DataSource

Common Attributes

The following attributes are shared between commons-dbcp and tomcat-jdbc-pool, in some cases default values are different.

  • defaultAutoCommit - (boolean) The default auto-commit state of connections created by this pool. If not set, default is JDBC driver default (If not set then the setAutoCommit method will not be called.)
  • defaultReadOnly - (boolean) The default read-only state of connections created by this pool. If not set then the setReadOnly method will not be called. (Some drivers don't support read only mode, ex: Informix)
  • defaultTransactionIsolation - (String) The default TransactionIsolation state of connections created by this pool. One of the following: (see javadoc )
  1. NONE
  2. READ_COMMITTED
  3. READ_UNCOMMITTED
  4. REPEATABLE_READ
  5. SERIALIZABLE

If not set, the method will not be called and it defaults to the JDBC driver.

  • defaultCatalog - (String) The default catalog of connections created by this pool.
  • driverClassName - (String) The fully qualified Java class name of the JDBC driver to be used. The driver has to be accessible from the same classloader as tomcat-jdbc.jar
  • username -(String) The connection username to be passed to our JDBC driver to establish a connection. Note, at this point, DataSource.getConnection(username,password) is not using the credentials passed into the method.
  • password - (String) The connection password to be passed to our JDBC driver to establish a connection. Note, at this point, DataSource.getConnection(username,password) is not using the credentials passed into the method.
  • maxActive - (int) The maximum number of active connections that can be allocated from this pool at the same time. The default value is 100.
  • maxIdle - (int) The maximum number of connections that should be kept in the pool at all times. Default value is maxActive:100 Idle connections are checked periodically (if enabled) and connections that been idle for longer than minEvictableIdleTimeMillis will be released. (also see testWhileIdle)
  • minIdle - (int) The minimum number of established connections that should be kept in the pool at all times. The connection pool can shrink below this number if validation queries fail. Default value is derived from initialSize:10 (also see testWhileIdle)
  • initialSize - (int)The initial number of connections that are created when the pool is started. Default value is 10
  • maxWait - (long) The maximum number of milliseconds that the pool will wait (when there are no available connections) for a connection to be returned before throwing an exception. Default value is 30000 (30 seconds)
  • testOnBorrow - (boolean) The indication of whether objects will be validated before being borrowed from the pool. If the object fails to validate, it will be dropped from the pool, and we will attempt to borrow another. NOTE - for a true value to have any effect, the validationQuery parameter must be set to a non-null string. Default value is false
  • testOnReturn - (boolean) The indication of whether objects will be validated before being returned to the pool. NOTE - for a true value to have any effect, the validationQuery parameter must be set to a non-null string. The default value is false.
  • testWhileIdle - (boolean) The indication of whether objects will be validated by the idle object evictor (if any). If an object fails to validate, it will be dropped from the pool. NOTE - for a true value to have any effect, the validationQuery parameter must be set to a non-null string. The default value is false and this property has to be set in order for the pool cleaner/test thread is to run (also see timeBetweenEvictionRunsMillis)
  • validationQuery - (String) The SQL query that will be used to validate connections from this pool before returning them to the caller. If specified, this query does not have to return any data, it just can't throw a SQLException. The default value is null. Example values are SELECT 1(mysql), select 1 from dual(oracle), SELECT 1(MS Sql Server)
  • timeBetweenEvictionRunsMillis - (long) The number of milliseconds to sleep between runs of the idle connection validation/cleaner thread. This value should not be set under 1 second. It dictates how often we check for idle, abandoned connections, and how often we validate idle connections. The default value is 5000 (5 seconds).
  • numTestsPerEvictionRun - (int) Property not used in tomcat-jdbc-pool.
  • minEvictableIdleTimeMillis - (long) The minimum amount of time an object may sit idle in the pool before it is eligible for eviction. The default value is 60000 (60 seconds).
  • accessToUnderlyingConnectionAllowed - (boolean) Property not used. Access can be achieved by calling unwrap on the pooled connection. see javax.sql.DataSource interface, or call getConnection through reflection.
  • removeAbandoned - (boolean) Flag to remove abandoned connections if they exceed the removeAbandonedTimout. If set to true a connection is considered abandoned and eligible for removal if it has been in use longer than the removeAbandonedTimeout Setting this to true can recover db connections from applications that fail to close a connection. See also logAbandoned The default value is false.
  • removeAbandonedTimeout - (long) Timeout in seconds before an abandoned(in use) connection can be removed. The default value is 60 (60 seconds). The value should be set to the longest running query your applications might have.
  • logAbandoned - (boolean) Flag to log stack traces for application code which abandoned a Connection. Logging of abandoned Connections adds overhead for every Connection borrow because a stack trace has to be generated. The default value is false.
  • connectionProperties - (String) The connection properties that will be sent to our JDBC driver when establishing new connections. Format of the string must be [propertyName=property;]* NOTE - The "user" and "password" properties will be passed explicitly, so they do not need to be included here. The default value is null.
  • poolPreparedStatements - (boolean) Property not used. The default value is false.
  • maxOpenPreparedStatements - (int) Property not used. The default value is false.
Tomcat JDBC Connection Pool Specific Properties

  • initSQL - (String) A custom query to be run when a connection is first created. The default value is null.
  • jdbcInterceptors (String) A semicolon separated list of classnames extending org.apache.tomcat.jdbc.pool.JdbcInterceptor class. These interceptors will be inserted as an interceptor into the chain of operations on a java.sql.Connection object. The default value is null.
    Predefined interceptors:
    1. org.apache.tomcat.jdbc.pool.interceptor.ConnectionState - keeps track of auto commit, read only, catalog and transaction isolation level.
    2. org.apache.tomcat.jdbc.pool.interceptor.StatementFinalizer - keeps track of opened statements, and closes them when the connection is returned to the pool.
  • validationInterval - (long) avoid excess validation, only run validation at most at this frequency - time in milliseconds. If a connection is due for validation, but has been validated previously within this interval, it will not be validated again. The default value is 30000 (30 seconds).
  • jmxEnabled - (boolean) Register the pool with JMX or not. The default value is true.
  • fairQueue - (boolean) Set to true if you wish that calls to getConnection should be treated fairly in a true FIFO fashion. This uses the org.apache.tomcat.jdbc.pool.FairBlockingQueue implementation for the list of the idle connections. The default value is false. This flag is required when you want to use asynchronous connection retrieval.
  • useEquals - (boolean) Set to true if you wish the ProxyConnection class to use String.equals instead of == when comparing method names. This property does not apply to added interceptors as those are configured individually. The default value is false.
As a Resource

Please see the example below as to how to configure the Tomcat JDBC DataSource as a resource. I am using DB2 as the sample database for this example.


<Resource
auth="Container"
defaultAutoCommit="true"
defaultReadOnly="false"
defaultTransactionIsolation="READ_COMMITTED"
driverClassName="com.ibm.db2.jcc.DB2Driver"
factory="org.apache.tomcat.jdbc.pool.DataSourceFactory"
fairQueue="false"
initSQL="SELECT DTS FROM DT_TM_TS FOR READ ONLY WITH UR"
initialSize="10"
jdbcInterceptors="org.apache.tomcat.jdbc.pool.interceptor.ConnectionState;org.apache.tomcat.jdbc.pool.interceptor.StatementFinalizer"
jmxEnabled="true"
logAbandoned="true"
maxActive="100"
maxIdle="100"
maxWait="6000"
minEvictableIdleTimeMillis="30000"
minIdle="10"
name="jdbc/sampleDS"
password="xxxxxxxxxxx"
removeAbandoned="true"
removeAbandonedTimeout="60"
testOnBorrow="true"
testOnReturn="false"
testWhileIdle="false"
timeBetweenEvictionRunsMillis="30000"
type="javax.sql.DataSource"
url="jdbc:db2://os01.in.vbose.com:4745/DSNQ:currentFunctionPath=SAMPLE;IGNORE_DONE_IN_PROC=true;currentSchema=SAMPLE;"
useEquals="false"
username="abcdefg"
validationInterval="1800000" validationQuery="SELECT DTS FROM DT_TM_TS FOR READ ONLY WITH UR"/>


Wiring Tomcat JDBC DataSource using Spring Application Context

The DataSource class available within Tomcat JDBC Pool can also be instantiated through IoC and implements the DataSource interface since the DataSourceProxy is used as a generic proxy. The following is an example of using Spring application context to wire the DataSource dependency. The example database used is DB2 9 running on mainframe z/OS.


<?xml version="1.0" encoding="UTF-8"?>
<beans xmlns="http://www.springframework.org/schema/beans" xmlns:xsi="http://www.w3.org/2001/XMLSchema-instance"
xmlns:p="http://www.springframework.org/schema/p"
xmlns:context="http://www.springframework.org/schema/context"
xsi:schemaLocation="http://www.springframework.org/schema/beans http://www.springframework.org/schema/beans/spring-beans-2.5.xsd
http://www.springframework.org/schema/context http://www.springframework.org/schema/context/spring-context-2.5.xsd">

<context:property-placeholder location="classpath:sample/jdbc.properties"/>
<bean id="datasource" class="org.apache.tomcat.jdbc.pool.DataSource" destroy-method="close"
p:driverClassName="${jdbc.sample.db.driverClassName}"
p:url="${jdbc.sample.db.url}"
p:username="${jdbc.sample.db.username}"
p:password="${jdbc.sample.db.password}"
p:initialSize="10"
p:initSQL="SELECT DTS FROM DT_TM_TS FOR READ ONLY WITH UR"
p:minIdle="10"
p:maxIdle="100"
p:maxActive="100"
p:maxWait="6000"
p:jmxEnabled="true"
p:jdbcInterceptors="org.apache.tomcat.jdbc.pool.interceptor.ConnectionState;org.apache.tomcat.jdbc.pool.interceptor.StatementFinalizer"
p:removeAbandoned="true"
p:removeAbandonedTimeout="60"
p:logAbandoned="true"
p:testOnBorrow="true"
p:testOnReturn="false"
p:testWhileIdle="false"
p:useEquals="false"
p:fairQueue="false"
p:timeBetweenEvictionRunsMillis="30000"
p:minEvictableIdleTimeMillis="30000"
p:validationInterval="1800000"
p:validationQuery="SELECT DTS FROM DT_TM_TS FOR READ ONLY WITH UR"
/>


In order to keep track of query performance and issues log entries when queries exceed a time threshold of fail, you may also use another built-in interceptor called org.apache.tomcat.jdbc.pool.interceptor.SlowQueryReport(threshold=10000). In this case, the log level used is WARN.

Additionally, if used within tomcat, you can add a JMX enabled interceptor called org.apache.tomcat.jdbc.pool.interceptor.SlowQueryReportJmx(threshold=10000). This class uses Tomcat's JMX engine so it wont work outside of the Tomcat container.

Conclusion

The tomcat JDBC connection pool (tomcat-jdbc.jar) is currently available as part of SpringSource tc Server, the enterprise version of Tomcat Server. In tc server, both DBCP and Tomcat JDBC are available and it is upto the system architect to decide which option is best to use in their applications.

The tomcat JDBC also depends on Tomcat JULI, a simplified logging framework used in Tomcat. So you may need tomcat-juli.jar if you want to use it outside tomcat container.

Monday, February 23, 2009

.NET client consuming Spring WS 1.5.5 using XWSS WS security Implementation

Introduction

I am currently working on an integration project where a .NET client has to consume a Java Web Service. Since I have been using Spring framework for a very long time, my natural inclination is to try out Spring WS 1.5.5 as the web service framework. So I picked spring framework 2.5.6, spring security 2.0.4 and spring web services 1.5.5 for the java web service implementation. I am using XWSS implementation of WS security under the hoods for the username token with password digest authentication mechanism.

The service consumer is a .NET client and apparently there were configuration issues with .NET that prevented them from consuming our service successfully. So I searched in google and posted the issue with Spring forums with no luck. So finally with the help of our .NET Software Engineer, I have managed to come up with a standard procedure as to how to consume a Java Web Service that implements WS security from a .NET client perspective.

Java Web Service Implementation

I am using Spring WS 1.5.5 Airline sample application that comes with its distribution to demonstrate the integration capability. The Airline sample is a normal web application that connects to an embedded HSQLDB database. This application uses XWSS implementation of WS-Security.

applicationContext-security.xml

<?xml version="1.0" encoding="UTF-8"?>
<beans xmlns="http://www.springframework.org/schema/beans"
xmlns:xsi="http://www.w3.org/2001/XMLSchema-instance"
xmlns:security="http://www.springframework.org/schema/security"
xsi:schemaLocation="http://www.springframework.org/schema/beans http://www.springframework.org/schema/beans/spring-beans-2.0.xsd
http://www.springframework.org/schema/security http://www.springframework.org/schema/security/spring-security-2.0.xsd">

<description>
This application context contains the WS-Security and Sprign Security beans.
</description>

<security:global-method-security secured-annotations="enabled"/>

<security:authentication-provider user-service-ref="securityService"/>

<bean id="securityService"
class="org.springframework.ws.samples.airline.security.SpringFrequentFlyerSecurityService">
<description>
A security service used to obtain Frequent Flyer information.
</description>
<constructor-arg ref="frequentFlyerDao"/>
</bean>

<bean id="wsSecurityInterceptor" class="org.springframework.ws.soap.security.xwss.XwsSecurityInterceptor">
<description>
This interceptor validates incoming messages according to the policy defined in 'securityPolicy.xml'.
The policy defines that all incoming requests must have a UsernameToken with a password digest in it.
The actual authentication is performed by the Spring Security callback handler.
</description>
<property name="secureResponse" value="false"/>
<property name="policyConfiguration"
value="classpath:org/springframework/ws/samples/airline/security/securityPolicy.xml"/>
<property name="callbackHandler">
<bean class="org.springframework.ws.soap.security.xwss.callback.SpringDigestPasswordValidationCallbackHandler">
<property name="userDetailsService" ref="securityService"/>
</bean>
</property>
</bean>

</beans>
Spring ws currently supports two implementations of WS Security. One is based on XWSS and the other one is WSS4J from Apache.

XWSS


XWSS stands for XML and WebServices Security runtime. It is part of Project GlassFish and is used for securing WebServices requests and responses.

XWSS 2.0 was based on OASIS WSS specification version 1.0 and XWSS 3.0 is based on OASIS WSS specification 1.1

XwsSecurityInterceptor

The XwsSecurityInterceptor is an EndpointInterceptor that is based on SUN's XML and Web Services Security package (XWSS). This WS-Security implementation is part of the Java Web Services Developer Pack ( Java WSDP ). Like any other endpoint interceptor, it is defined in the endpoint mapping. This means that you can be selective about adding WS-Security support: some endpoint mappings require it, while others do not.

Note that XWSS requires both a SUN 1.5 JDK and the SUN SAAJ reference implementation. The WSS4J interceptor does not have these requirements.

The XwsSecurityInterceptor requires a security policy file to operate. This XML file tells the interceptor what security aspects to require from incoming SOAP messages, and what aspects to add to outgoing messages.

securityPolicy.xml

<xwss:SecurityConfiguration dumpMessages="false" xmlns:xwss="http://java.sun.com/xml/ns/xwss/config">
<xwss:RequireUsernameToken passwordDigestRequired="true" nonceRequired="true"/>
</xwss:SecurityConfiguration>

Spring WS endpoint Mappings
The endpoint mapping is responsible for mapping incoming messages to appropriate endpoints. There are some endpoint mappings you can use out of the box. Please refer the example in the applicationContext-ws.xml file below.

applicationContext-ws.xml

<?xml version="1.0" encoding="UTF-8"?>
<beans xmlns="http://www.springframework.org/schema/beans"
xmlns:xsi="http://www.w3.org/2001/XMLSchema-instance"
xmlns:oxm="http://www.springframework.org/schema/oxm"
xmlns:sws="http://www.springframework.org/schema/web-services"
xsi:schemaLocation="http://www.springframework.org/schema/beans http://www.springframework.org/schema/beans/spring-beans-2.5.xsd
http://www.springframework.org/schema/oxm http://www.springframework.org/schema/oxm/spring-oxm-1.5.xsd
http://www.springframework.org/schema/web-services http://www.springframework.org/schema/web-services/web-services-1.5.xsd">

<bean id="messageFactory" class="org.springframework.ws.soap.saaj.SaajSoapMessageFactory"/>

<bean id="messageReceiver" class="org.springframework.ws.soap.server.SoapMessageDispatcher"/>

<bean id="schemaCollection" class="org.springframework.xml.xsd.commons.CommonsXsdSchemaCollection">
<description>
This bean wrap the messages.xsd (which imports types.xsd), and inlines them as a one.
</description>
<property name="xsds" value="/messages.xsd"/>
<property name="inline" value="true"/>
</bean>

<!-- ===================== ENDPOINTS ===================================== -->

<!--
The marshallingEndpoint and xpathEndpoint handle the same messages. So, you can only use one of them at the
same time. This is done for illustration purposes only, typically you would not create two endpoints which
handle the same messages.
-->

<bean id="marshallingEndpoint" class="org.springframework.ws.samples.airline.ws.MarshallingAirlineEndpoint">
<description>
This endpoint handles the Airline Web Service messages using JAXB2 marshalling.
</description>
<constructor-arg ref="airlineService"/>
</bean>

<!--
<bean id="xpathEndpoint" class="org.springframework.ws.samples.airline.ws.XPathAirlineEndpoint">
<description>
This endpoint handles the Airline Web Service messages using XPath expressions and JAXB2 marshalling.
</description>
<constructor-arg ref="airlineService"/>
<constructor-arg ref="marshaller"/>
</bean>
-->

<bean id="getFrequentFlyerMileageEndpoint"
class="org.springframework.ws.samples.airline.ws.GetFrequentFlyerMileageEndpoint">
<description>
This endpoint handles get frequent flyer mileage requests.
</description>
<constructor-arg ref="airlineService"/>
</bean>

<oxm:jaxb2-marshaller id="marshaller" contextPath="org.springframework.ws.samples.airline.schema"/>

<!-- ===================== ENDPOINT MAPPINGS ============================== -->

<!--
The endpoint mappings map from a request to an endpoint. Because we only want the security interception to
occur for the GetFrequentFlyerMileageEndpoint, we define two mappings: one with the securityInterceptor, and
a general one without it.
-->

<bean id="annotationMapping"
class="org.springframework.ws.server.endpoint.mapping.PayloadRootAnnotationMethodEndpointMapping">
<description>
Detects @PayloadRoot annotations on @Endpoint bean methods. The MarshallingAirlineEndpoint
has such annotations. It uses two interceptors: one that logs the message payload, and the other validates
it accoring to the 'airline.xsd' schema file.
</description>
<property name="interceptors">
<list>
<bean class="org.springframework.ws.server.endpoint.interceptor.PayloadLoggingInterceptor"/>
<bean class="org.springframework.ws.soap.server.endpoint.interceptor.PayloadValidatingInterceptor">
<property name="xsdSchemaCollection" ref="schemaCollection"/>
<property name="validateRequest" value="true"/>
<property name="validateResponse" value="true"/>
</bean>
</list>
</property>
<property name="order" value="1"/>
</bean>

<bean id="secureMapping" class="org.springframework.ws.server.endpoint.mapping.PayloadRootQNameEndpointMapping">
<description>
This endpoint mapping is used for endpoints that are secured via WS-Security. It uses a
securityInterceptor, defined in applicationContext-security.xml, to validate incoming messages.
</description>
<property name="mappings">
<props>
<prop key="{http://www.springframework.org/spring-ws/samples/airline/schemas/messages}GetFrequentFlyerMileageRequest">
getFrequentFlyerMileageEndpoint
</prop>
</props>
</property>
<property name="interceptors">
<list>
<bean class="org.springframework.ws.soap.server.endpoint.interceptor.SoapEnvelopeLoggingInterceptor"/>
<ref bean="wsSecurityInterceptor"/>
</list>
</property>
<property name="order" value="2"/>
</bean>


<!-- ===================== ENDPOINT ADAPTERS ============================== -->

<!--
Endpoint adapters adapt from the incoming message to a specific object or method signature. Because this
example application uses three different endpoint programming models, we have to define three adapters. This
is done for illustration purposes only, typically you would use one adapter, for instance the
MarshallingMethodEndpointAdapter.
-->


<sws:marshalling-endpoints/>

<sws:xpath-endpoints>
<sws:namespace prefix="messages"
uri="http://www.springframework.org/spring-ws/samples/airline/schemas/messages"/>
</sws:xpath-endpoints>

<bean class="org.springframework.ws.server.endpoint.adapter.PayloadEndpointAdapter">
<description>
This adapter allows for endpoints which implement the PayloadEndpoint interface. The Get
FrequentFlyerMileageEndpoint implements this interface.
</description>
</bean>

<!-- ===================== ENDPOINT EXCEPTION RESOLVER ===================== -->

<!--
Endpoint exception resolvers can handle exceptions as they occur in the Web service. We have two sorts of
exceptions we want to handle: the business logic exceptions NoSeatAvailableException and NoSuchFlightException,
which both have a @SoapFault annotation, and other exceptions, which don't have the annotation. Therefore, we
have two exception resolvers here.
-->

<bean class="org.springframework.ws.soap.server.endpoint.SoapFaultAnnotationExceptionResolver">
<description>
This exception resolver maps exceptions with the @SoapFault annotation to SOAP Faults. The business logic
exceptions NoSeatAvailableException and NoSuchFlightException have these.
</description>
<property name="order" value="1"/>
</bean>

<bean class="org.springframework.ws.soap.server.endpoint.SoapFaultMappingExceptionResolver">
<description>
This exception resolver maps other exceptions to SOAP Faults. Both UnmarshallingException and
ValidationFailureException are mapped to a SOAP Fault with a "Client" fault code.
All other exceptions are mapped to a "Server" error code, the default.
</description>
<property name="defaultFault" value="SERVER"/>
<property name="exceptionMappings">
<props>
<prop key="org.springframework.oxm.UnmarshallingFailureException">CLIENT,Invalid request</prop>
<prop key="org.springframework.oxm.ValidationFailureException">CLIENT,Invalid request</prop>
</props>
</property>
<property name="order" value="2"/>
</bean>

</beans>


After deploying the above said service, the service will run at http://localhost:8080/airline/services. The wsdl is published at http://localhost:8080/airline/airline.wsdl

NOTE: There are other applicationContext xml files within the airline sample application which I am not mentioning here in this article for brevity. I would highly recommend you refer the sample airline application that comes with Spring WS 1.5.5 or 1.5.6.

There is already a .NET example within airline application which does not require to go to WS security intereceptor configured at the airline service level. The next section will give you enough details as to how to configure the .NET client side to access the airline sample service that goes through XWSS security interceptor configured within the application.

.NET client configuration using WSE 2.0

Prerequisites
:

1) Make sure you have WSE2.0 installed and .NET 1.1 (at least)

How do you verify the above prerequisite?


Check
whether Microsoft.Web.Services2.dll exists under C:\Program Files\Microsoft WSE\v2.0\Microsoft.Web.Services2.dll

If WSE 2.0 is not installed, please download it from here.

NOTE: The dll Microsoft.Web.Services2.dll plays the role of encrypting or decrypting the request and responses of the service.

.NET consuming Java Web Service

Please follow the steps below to consume web service using WSE 2.0

1. Enable WSE 2.0 extensions


In visual studio,
  • Select your project and right click
  • Select WSE setting 2.0 from the context menu
  • In the General tab, check 'Enable this project for Web Services Enhancements' checkbox
  • check 'Enable Microsoft Web Services Enhancement soap extensions'

2. Add Web References

In visual studio,
  • Select your project and right click
  • Select 'Add Web References' from the context menu
  • Enter the web service URL. For e.g. http://localhost:8080/airline/airline.wsdl
  • Hit go button to search the service
  • If the service is found, name the service and 'Add Reference'

3. How to verify whether the added service has WSE 2.0 service extension

  • Expand the service and open the source code of 'Reference.cs'
  • Class should extend Microsoft.Web.Services2.WebServicesClientProtocol

4. Changes in .NET Client class which consume the service

  • Include following namespace (this is to create 'UsernameToken')
using Microsoft.Web.Services2;
using Microsoft.Web.Services2.Security;
using Microsoft.Web.Services2.Security.Tokens;


  • In the code, add UsernameToken in the soap header

For e.g.,

UsernameToken un =
new UsernameToken("UN","Pwd", PasswordOption.SendHashed);
svc.RequestSoapContext.Security.Tokens.Add(un);

In the above example, replace UN with 'john' and PWD with 'changeme' since this is what airline sample application uses.

5. Changes in web.config

Add <configSections> element under the <configuration> element if it is not already added


<configSections>
<section name="microsoft.web.services2" type="Microsoft.Web.Services2.Configuration.WebServicesConfiguration,
Microsoft.Web.Services2, Version=2.0.0.0, Culture=neutral, PublicKeyToken=31bf3856ad364e35" />
</configSections>

Add <webServices> element under <system.web> element if not added


<webServices>
<soapExtensionTypes>
<add type="Microsoft.Web.Services2.WebServicesExtension, Microsoft.Web.Services2, Version=2.0.0.0, Culture=neutral, PublicKeyToken=31bf3856ad364e35" priority="1" group="0" />
</soapExtensionTypes>
</webServices>


References

1. Spring WS 1.5.5 Reference Document
2. Spring WS forum
3. Microsoft .NET framework developer center (Article 1 and Article 2)

Conclusion

I hope this article will help any novice .NET software engineer in integrating with Java Web Services that implements WS Security. I sincerely thank my friend and colleague Mr. Thanasekaran Mariappan for helping me put together this article.

Friday, January 23, 2009

Virtualization on Ubuntu 810 server using VMWare Server 2.0, i7 chipset and MSI Eclipse x58

Introduction

I have recently built a machine using Intel's latest i7 processor and MSI Eclipse x58 motherboard. The idea was to build a high end machine for my application development and research work at home and I wanted to make use of server virtualization technology. This will dramatically improve the efficiency and availability of resources and applications that are hosted in a machine. I have chosen 10 GB RAM and 2 TB Harddrive with hardware raid in addition to the facilities provided by i7 64 bit processor and MSI Eclipse x58 motherboard offers.

Intel i7 Processor

Intel has brought back Hyper Threading technology with this latest i7 processor. Some of the core features of i7 processor are given below.
  • 2.93 GHz and 2.66 GHz core speed
  • 8 processing threads with Intel® HT technology
  • 8 MB of Intel® Smart Cach
  • 3 Channels of DDR3 1066 MHz memory
  • Intel 64 Bit Architecture
  • Intel Virtualization technology
MSI Eclipse x58

I have chosen MSI's latest x58 mother board for my machine. The MSI Eclipse x58 is the company’s first X58 motherboard for Intel Core i7. MSI stands for Micro Star International.

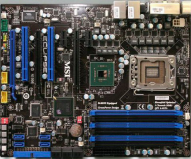
The motherboard is black in color. The copper heatpipes and attached heatsinks are moderate in size, implicitly assuming that the X58 chip, VRM's and Southbridge won't get too hot. Please click here to see MSI Eclipse x58 photo gallery.

Fig 1. MSI Eclipse x58 Motherboard

The MSI Eclipse features ten DrMOS High-C capacitors (six for the CPU, two for the northbridge and two for the QuickPath memory controller) which are designed for reliability and efficiency.

This motherboard features six DIMM slots to take advantage of Nehalem’s triple-channel DDR3 memory controller and can utilize up to 24GB of DDR3-1333+ RAM. It also supports overclocking as well.


HardWare Raid

The hardware-based system manages the RAID subsystem independently from the host and presents to the host only a single disk per RAID array.

An example of a Hardware RAID device would be one that connects to a SCSI controller and presents the RAID arrays as a single SCSI drive. An external RAID system moves all RAID handling "intelligence" into a controller located in the external disk subsystem. The whole subsystem is connected to the host via a normal SCSI controller and appears to the host as a single disk.

RAID controllers also come in the form of cards that act like a SCSI controller to the operating system but handle all of the actual drive communications themselves. In these cases, you plug the drives into the RAID controller just like you would a SCSI controller, but then you add them to the RAID controller's configuration, and the operating system never knows the difference.

Software Raid

Software RAID implements the various RAID levels in the kernel disk (block device) code. It offers the cheapest possible solution, as expensive disk controller cards or hot-swap chassis are not required. Software RAID also works with cheaper IDE disks as well as SCSI disks. With today's fast CPUs, Software RAID performance can excel against Hardware RAID.

The MD driver in the Linux kernel is an example of a RAID solution that is completely hardware independent. The performance of a software-based array is dependent on the server CPU performance and load.


Virtualization

Virtualization is a proven software technology that is rapidly transforming the IT landscape and fundamentally changing the way that people compute. Today’s powerful x86 computer hardware was designed to run a single operating system and a single application. This leaves most machines vastly underutilized. Virtualization lets you run multiple virtual machines on a single physical machine, sharing the resources of that single computer across multiple environments. I have picked VMWare because they are the market leader in Virtualization.

I wanted to use VMWare's latest ESX 3i 3.5 build as my server virtualization software. However, it did not support the hardware I have. The reason why I chose ESX3i over other VMWare products was because ESX3i is an OS-independent VMware hypervisor. So it does not need a host OS to run. VMware ESXi’s 32MB disk footprint is a fraction of the size of a general purpose operating system, reducing complexity and providing unmatched security and reliability.

Ubuntu 8.10 64 bit Server

Since ESX3i did not work for me. My other alternative was to try VMWare's latest VMWare server 2.0. This needs a host OS to run. I wanted to use Linux as the base server since the overhead with Linux is very minimum compared to Windows. I have initially chosen Ubuntu 8.0.4.02 LTS server as my base server. However, it also had issues with my hardware and seemed to hang some times. So I uninstalled Ubuntu 8.0.4.02 and installed Ubuntu 8.10 64 bit Server. Some of the issues with Ubuntu 8.0.4.02 were to do with the linux kernel version itslef. The kernel that comes with Ubuntu 8.10 is 2.6.27.x. The installation of Ubuntu 8.10 64 bit server was breeze and it detected all my hardware with no problems at all. Ubuntu 8.10 has a better support for software raid. However, I have chosen the hardware raid over the software raid simply because it was so easy to set it up at the BIOS level and I have two 1 TB hard drives for the mirror. The sata ports 7 and 8 in MSI Eclipse x58 Motherboard are dedicated for hard ware raid whereas 9 and 10 for eSata raid (External Hard Drives).

On distrowatch.com Ubuntu is listed as the most accessed distribution. The popularity of Ubuntu suggests that there will be business and job opportunities for those who are trained in configuration of the Ubuntu Server.

The Ubuntu Server Edition - built on the solid foundation of Debian which is known for its robust server installations — has a strong heritage for reliable performance and predictable evolution. It also supports server virtualization out of the box.

Ubuntu Server Edition JeOS (pronounced "Juice") is an efficient variant of the server operating system, configured specifically for virtual appliances.

JeOS is no longer provided as a separate ISO. Instead, it is an option that is activated on the server installer by pressing F4 on the first screen and selecting the "Install a minimal virtual machine" option. I have used JeOs from the same server installable CD to create other virtual machines.

Please click here to read more about Ubuntu 8.10 server features.

VMWare Server 2.0

I have downloaded VMWare Server 2.0 for 64 bit Linux TAR image (not the RPM image) from VMWare web site. I also activated the license key for the server. Obtaining the free license key or serial number is a very simple procedure from VMWare web site. You need to create an account with VMWare first and follow the instructions on the web site.

Instructions to install VMWare server 2.0 on Ubuntu 8.10 64 bit Server

Step 1. Log on to Ubuntu 8.10 server. Make sure the login id has administrator privileges.

Step 2.Install kernel headers which in my case was 2.6.27-7-generic (to do this use synaptic or apt-get )
Note : for finding your running kernel version use the command uname -a

sudo apt-get install linux-headers-`un
ame -r` build-essential xinetd

Step3. Then go to the location where you saved the VMware Server .tar.gz file, e.g. /home/administrator

cd /home/administrator

Unpack the VMware Server .tar.gz file and run the installer:

tar xvfz VMware-server-*.tar.gz
cd vmware-server-distrib
sudo ./vmware-install.pl


The installer will ask you a lot of questions. You can always accept the default values simply by hitting ENTER.

When the installer asks you

In which directory do you want to keep your virtual machine files?
[/var/lib/vmware/Virtual Machines]

you can either accept the default value or specify a location that has enough free space to store your virtual machines.

At the end of the installation, you will be asked to enter a serial number:

Please enter your 20-character serial number.

Type XXXXX-XXXXX-XXXXX-XXXXX or 'Enter' to cancel:

Fill in your serial number for VMware Server.

After the successful installation, you can delete the VMware Server download file and the installation directory:

cd /home/administrator
rm -f VMware-server*
rm -fr vmware-server-distrib/

NOTE: In between the installations, VMWare Server has to rebuild some of the libraries. However, it will fail to rebuild the vsock library and it is a bug posted in VMWare forum and it will not do any harm to the installation or the way virtual machines work.

vsock = VM communication interface socket

If you have accepted all default values during the installation, root is now the VMware Server login name. On Ubuntu, root has no password by default, therefore we create a password now:

sudo passwd
Enter new UNIX password:
Retype new UNIX password:


After reset root password. It will show this message in Shell.

passwd: password updated successfully

VMware Server 2 does not have a desktop application for managing virtual machines - this is now done through a browser (e.g. Firefox). You can access the management interface over HTTPS (https://:8333) or HTTP (http://:8222); the management interface can be accessed locally and also remotely. If you want to access it from the same machine, type https://xx.xx.xx.xx:8333 or http://xx.xx.xx.xx:8222 into the browser's address bar. Replace xx with the actual IP address of the machine.

Fig 2: VMWare Server 2.0 Management Web Interface

If you're using Firefox 3 and use HTTPS, Firefox will complain about the self-signed certificate, therefore you must tell Firefox to accept the certificate - to do this, click on the kink Or you can add an exception.

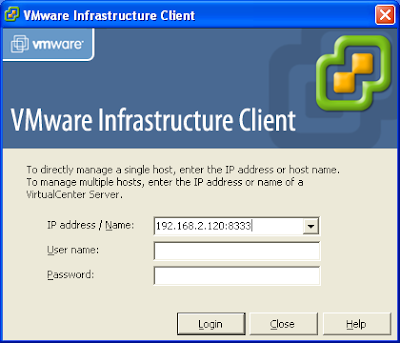
Alternately, you can also manage the virtual machines using Virtual Machine Infrastructure Client that comes with ESX3i. The default https port Virtual Machine Infrastructure Client uses is 443. So if you have chosen 8333 as the default port for VMWare Server 2.0 , then in the Virtual Machine Infrastructure Client login, you may also have to use the port 8333 as seen in the following figure.


Fig 3. Virtual Machine Infrastructure Client Login


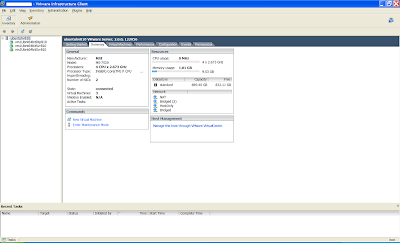
Fig 4: Virtual Machine Infrastructure Client Management Interface


References

1. VMWare - http://www.vmware.com/products/server/
2. Ubuntu Web Site - https://help.ubuntu.com/8.10/serverguide/C/index.html
3. Ubuntu Installation Guide - https://help.ubuntu.com/8.10/installation-guide/amd64/index.html
4. Ubuntu Forums - http://ubuntuforums.org/

Conclusion

VMware Server Infrastructure unifies discrete hardware resources to create a shared dynamic platform, while delivering built–in availability, security and scalability to applications. It supports a wide range of operating system and application environments, as well as networking and storage infrastructure.